
E
is for
ENVELOPE FOLD CARD.
Version I
is for
ENVELOPE FOLD CARD.
Version I
1. Uses 2 pieces of cardstock cut to 5.5" x 11" scored and folded at 5.5" to make 2 card bases 5.5 x 5.5


4. Now attach the uncut pieces on top of each other to look same as below


6. Now decorate the back panel and apply d.s.tape to the bottom only before closing
the right hand side triangle over to form an enclosed pocket.


9. Decorate the remaining triangle on the inside as you wish. Here I have used cream cardstock to compliment the design paper.


11. Here is my finished card front.

Version II
1. Uses 1 piece of cardstock cut to 8.25" x 8.25".

2. Fold up one corner to the opposite to form a triangle.

3. Unfold and then repeat with the other corners. Unfold. Cardstock will look like this.

Fold the North point down to the centre point of cardstock and bring the South Point up to meet in the centre.
 5. Fold the East and West points into the centre and cardstock will now look like this.

 7. Once well scored and flat, unfold and decorate each triangle separately with design paper. Refold on the crease line as shown below.n.b. Do not put a crease in the top and bottom triangles.

8. Fold in half again and peg the sides.

 9. Before sticking the sides together these pockets need to be decorated. Cut two pieces of contrasting paper 5.5" x 2.75" and if required punch one long edge.
 10. Unfold cardstock and attach these inside as shown and stamp any images or sentiments that are required.
 11. Refold and peg then score the crease line again so that it sits as much flat as possible.
 12. Unfold and turn over. Attach (thin)double side tape or heavy duty glue to the short sides as shown below. n.b I only used the white d.s. but I recommend that if using tape then the red heavy duty one it best as my sides popped open until I re did with red tape. Bring long edges back up and stick sides together. This will now form a further pocket in the centre.
 13.Cut a piece of contrasting card stock 3.5" x 5.25". If required punch one long edge to decorate.
 14. n.b. I have cut a further 2 strips in design paper and punched the same design. I then lined up the pattern and glued 1 strip on either side.

 16. You can see here where I have stamped and decorated inside the front pocket


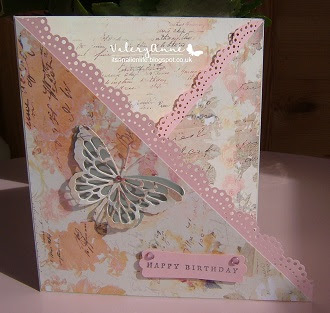
17. Here is my finished card front.

 2. Make a pencil mark at 3.5" and 8.5". Draw a diagonal line from this pencil mark down to each opposite corner. Cutaway the corner pieces as shown below.
 3. Once folded over and each side secured down you will have an envelope fold as shown here.
 4. Decorate the panels first before adhering down.
 These pictures are showing the back of the envelope shape prior to folding over to make the envelope. Adhere design paper to the inside of the pocket as well.
 5. Cut cardstock to 3.75" x 4" for the insert and decorate as required. Punch hole and attach ribbon at top for pulling card out.
 6. Here is the finished design.


6. Turn cardstock over and then fold in half bringing two edges up together as below. Peg in place and then score the folded middle edge. n.b. It will want to spring open as the folded sheets are quite thick. Keep scoring until it sits flat.


You will now have a pocket formed on either side with an envelope flap.


15. Stamp and decorate the panel as required or leave blank for a message.


and on the reverse pocket.


Version III
1. Very similar to Version I. but both panels are secured down and the pocket shape is more defined. Uses 1 piece of cardstock cut to 4" x 12". Score and fold at 4" and 8" along the 12" side.


Version IV
1. Very similar to Version II. but here you are only making two pockets. Follow instructions from Version II above from 1 to 6 and then follow on as below. Fold the back triangle fold upwards


3. Decorate as required along with the back of the card as shown below.


Version V
1. Makes a completely open envelope shape that is held closed using a belly band.
Cut cardstock for base 11.5" x 6" and divide into 3 equal panels. Score and crease well.


Fabulous! Thanks for the tutorial and the inspirations!!
ReplyDelete