1. Using coloured cardstock cut a piece 11cm x 23cm long and score at 6cm in from each of the short sides. This is your base card. N.B. when folded the sides will overlap in the middle, this is correct.
2. Cut your cardstock for the napkin element 20cm x 20cm. Do not use a thick card.
I have used 120 gsm. N.B. Any thicker than this and you will not get the precise folds needed.
For the purposes of this tutorial I have cut a 20cm square using copy paper so that you can see more clearly.
3. On all four sides mark with a pencil at 5cm, 10cm and 15 cm4. Use these pencil marks to fold each side into the centre 10cm mark. I have not used my score board to score these lines first as you really do need to be very precise (with the measurements) when folding and the score tool blade can make the folds thicker. 4. Again using only a pencil, draw lines from each 10cm to the next 10cm around the paper. 5. Turn paper over and repeat on the reverse. This will give a good indent and show you where you need to fold in the next step.6. Turn paper back over to the front and carefully fold on these diagonal lines so that your paper looks like below.
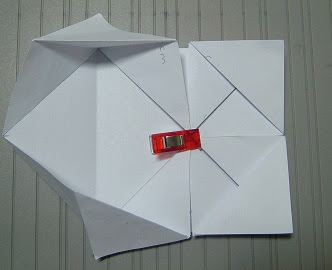
9. Turn paper round so that you have one of the inner points at the top as shown here. 10. Fold the point down as shown with the two outside triangles (being held with the pegs in the photo) also folded as shown. N.B. Pegs are only there for me to be able to take the photos and are not needed in the next steps.
11. Take hold of the small triangle and fold the paper so that one side of the point of the V is folded up to the top edge ( as shown by the peg holding it).
12. Repeat with other side of the V so that your paper looks like below.13. Continue going round each side and repeating as above.14. You will find that the paper implodes into shape almost by itself as you work round.
15. Below shows the last side being folded into place. 16. Here is the finished Napkin fold. N.B. There are a number of different ways to fold your napkin but this is by far the easiest way to do it and gives a nice finish to decorate with. Here is the napkin folded using the 120 gsm design paper.
17. You can now go ahead and complete your card. Once you have decorated the napkin simply adhere to the centre of the base card and then finish the front of the card as required. Here is my finished card.


This is absolutely beautiful Mrs A so creative love the colours and papers xx
ReplyDelete