B
is for
is for
BOOK BINDING FOLD
There are 3 Versions
Version I
The instructions below are for the Fold element only and not the whole card design.
For Version I
1. Cut cardstock 4.5" x 11". Score on long side (11") at 4.25" and 5.5"
2. Fold on the the 5.5" score line to create a card base that is 4 .5"" x 5.5"
5. Use glue or d.s.tape to adhere the spine fold together and decorate the rest of the card as required.
Here is my finished card.
Inside of finished card.
Version II
Made with an acetate front cover.
1. Cut cardstock 7" x 5". Score on 7" length at 1.5"
3. Turn cardstock over and adhere design paper that has been cut 1.25" x 5" to the small panel on the right.
4. Turn card back over and cut a piece of acetate that is 5.5" x 5" and place over the top of the design paper. Use d.s. tape and adhere the small panel down on top of the acetate to form the front of card.
5. Open card and now add 2 strips of d.s. tape to the back of the the acetate at the fold edge and stick down onto the design paper.
6. Card is now complete.
Version III
This is to make the Book Binding Explosion Card.
1. Cut 2 pieces of coloured cardstock 7" x 5".
2. Take one piece and score at 2" on the 7" length and fold.
4. Decorate both panels with design paper of your choice cut to fit.
5. To create the explosion element of the card use design paper either plain or patterned . I have used plain here. Cut a square that is 6.5" x 6.5".
9. Open paper back out and it should like this.
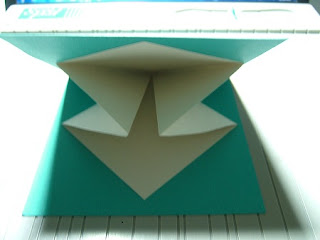
10. Now take hold of the left triangle fold and gently pull down as shown in these two photos below.
11. Keeping in place take the right hand triangle and fold down to meet in the middle as shown shown in the sequence of photos below.
13. Adhere d.s. tape all round the top edge as shown below.
14. Now open up your card base and carefully place the folded square (making sure that closed edge marked with the arrow i.e. the centre point of your square) is placed to the fold in your card and evenly placed on the other three edges. Remove the tape covering and fold the card front down over your square being careful not to move it as you do so.
16.Remove the tape covering and close card down. Your explosion mechanism is now adhered in place.
17 You can now decorate and finish your card as required.
Here is my finished version.


Absolutely wonderful tutorials and cards x
ReplyDeleteWow, Wow, Wow! These look fabulous! Surely this one I can do! That final one is AMAZING and I want to give that one a go too! Thank you for your tutorial!
ReplyDeleteEasy folding and love especially the third with the pop up mechanism inside!
ReplyDelete