
D
is for
DOUBLE POINT FOLD CARD.
Version I
is for
DOUBLE POINT FOLD CARD.
Version I
1. Uses cardstock cut to 4.25"" x 5.5" for the card base. You will also need a piece of patterned card stock cut to 4" x 5.25"

2. To make the points you will need two pieces of contrasting design paper cut to
3" x 4". Score at 1" down the long side.

3. Turn paper over and make a mark at the half way point i.e 2". Fold each corner into the this centre keeping level with the 1" score line.

4. This will create the two v shape points. Stick or glue the flaps down in place.


11. Cut a duplicate from the design paper and on the reverse mark in 1/8th" all the way round and then either trim with scissors or your trimmer on this line.


14. Finish decorating the front as required.

Version II
This shows a different way to create the double points and also has a closure to hold the front flap down in place.
1. Uses cardstock cut to 4.5" x 11.5" Score either end on the long side as shown below.


3. Card base will now look like below. Fold and score well on the two creases.


Cut on the inside of the line so that the finished points will be slightly smaller than the points on the base card.
 6. You can see here that my wording is cut so that it is the right way up on both of the points. Cut a piece of design paper that is 4.5" x 5.75" for the inside of the card.
 7. Attach the design paper to the base card. You may need to trim the edges down slightly to fit as it will depend on how thick your scrore lines are on the card stock.

 9. For the front closure I have used circle dies for the centre and a smaller circle raised up with 3d pads for the bottom of the circle to rest behind. n.b. Make sure that you only attach the circle to the top double point.


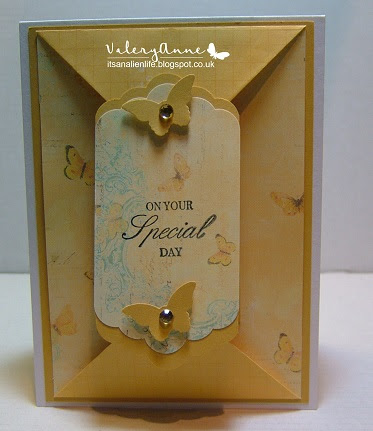
9. Finish decorating the front of your card as required. In my example below I have used a punch that creates a tag shape and made two layers up.Remember to only attach to the the top point or the flap will not open up.
 N.b. Using only thin designer paper will ensure that the panels will lie flat.
 The finished card.


8. Add a sentiment is required.


Version III
1. These instructions are for making as a tent fold cad.
Start by folding a piece of cardstock 4.25" x 11.5" in half to create the tent fold.

2. Cut two pieces of cardstock 4" x 5.5" . Cut another two pieces of design paper 3.75" x 5.25". n.b. In the photo the design paper is turned over so that I could write the dimensions on for you to read.

3. Use one piece of the plain cardstock and one of the design paper to layer up and attach inside the tent fold.

4. Cut two pieces of contrasting design paper as shown below and score on the long edge at 1".

5. Fold the edges into the middle as shown below.

6. Crease well and stick down to create the points.


7. Using glue or d.s. tape to attach the points top and bottom of the second design paper so that the 1" flaps are on the reverse side


8. Now attach to the last sheet of plain card stock. and layer onto the front of the tent card.

9. Finish decorating the front of your card as required. In my example below I have used a punch that creates a tag shape and made two layers up.Remember to only attach to the the top point or the flap will not open up.


So pretty Mrs A and the finish is beautiful love the floral paper and nice that you shared your tutorials enjoy your day x
ReplyDeleteThank you so much for the tut . . . . love this card and its variations.
ReplyDeletex