
M
is for
MAGIC WINDOW CARD.
is for
MAGIC WINDOW CARD.
Version I
1.
Start by cutting a base card shape from cardstock. Don't use a thick card (I have used 160gsm) or the card will not close and stay flat. Cut to 8" x 5" and score along the 8" side at 2" and 6". When folded this will give you a gate fold shape 4" x 5".

2.
Make a pencil mark at 1" and 4" down each score line.

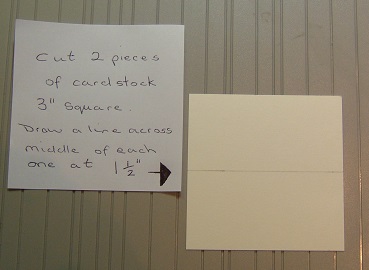
Cut to pieces of card stock 3" square and draw a pencil line across middle of each one at 1.5".
Make a mark on this line as shown below. Then draw two lines out from this mark to the corners.

Cut section marked #### away. Score quarter of an inch on opposite side and fold.

Cut a piece of cardstock 2.5" x 5". Draw a pencil line at 1.25" and 2.5" to find centre point of card.

Use a circle die to cut a hole in centre of card.

You should now have a piece of card as below. Remove pencil lines as these are not needed.

Using d.s.tape or glue adhere the cut out panels to either side of the base gatefold card as shown below . Lining up carefully between the markers and the score lines.

You should now have your base card looking like this .

11.
From a contrasting colour, die cut a circle to fit under the diamond shape. Stamp with a sentiment of your choice.

Make sure all of the wording can be seen when the card is open flat and adhere the circle with d.s. tape or glue.

Card should now look as shown here.

Now take the piece of card with the die cut circle and place over the top of the diamond panels making sure that you have one diamond on top of the other (not entwined). Adhere this panel top and bottom to the back of the card base.

Now as you open and close the card up the sentiment appears as if by magic.


You can now decorate the front of the card to finish.


5 comments:
Totally stunning and a great tutorial Mrs A thank you for sharing this x
What a great fold - thank you for the tutorial
Blessings
Maxine
Oooh this is clever!!
Thanks so much for the tutorial! This one is a technique that I want try!
Great tutorial and card Mrs. A
Post a Comment