We are now onto the 8th letter of the alphabet which is H. Winners results for #123 are in the post below. Make sure you check back as it could be you. Can I please ask that Winners do acknowledge their prize in the comments on the Winners post as well as emailing their details to me. This way I will know to expect an email. Please state if you are only playing for fun so that it gives someone else the chance to win.
Please note that this Challenge is now back to the normal 2 wks.
Come on in.
Lets Spin the Butterfly Wheel.
Each challenge will be a letter of the Alphabet with a choice of 3 Colours and 2 Themes all beginning with the chosen letter.
New for this Yr. The 7th element of the wheel is a card shape.
(The discerning amongst you will notice that there is now an added page along the top under the Butterfly Banner called Card shapes.)
There will be a card shape for the letter being used for each challenge and I will be showing a tutorial on this page with hints and tips for making the cards.
The card shape is not mandatory but if you do use it you will qualify for the top prize without having to combine all of the other 6 elements onto your card. You must of course use your butterfly. The shapes will all be easy ones, just a different way to either fold or cut your basic cardbase.
If you don't want to use the card shape then
You can either choose a Theme or a Colour from the wheel + Butterfly to be entered for the 1st Prize.
If you use a Butterfly + a Theme + a Colour from the wheel then
you will be entered into the 2nd Prize.
Please state in your post which part of the wheel you are using to play with.
So lets get started.
The wheel is
H
and
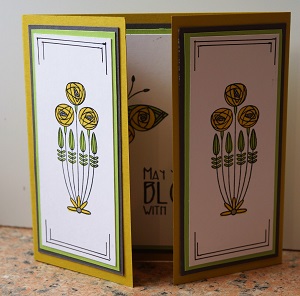
Hinged Card.

Your 6 elements are Hunters Green/Hot Pink/Heliotrope/Heat Embossed/Hexagons + your Butterfly.
n.b Heliotrope = purple.
Here is my inspiration for you.
First card uses Hinged fold/Hunters Green/Hot pink / Butterfly.

Second card uses Hinged card /Hot Pink/Heat Embossed/ Butterfly.

Third card is also a hinged card but uses a Hexagon die to make the card shape. Uses Hinged card /Hot Pink/Hunters green/Hexagons/ Butterfly.

You can see more details of the cards here on my blog.
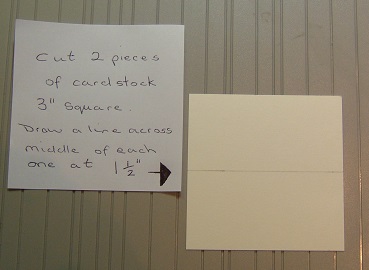
Also check out the Card shapes Tab at top of page to see how to make a Hinged
Card.
1st Prize
(for using either One Theme or One Colour with your butterfly/ies)
Please state in your post which part of the wheel you are using to play with.
2 Butterfly background sheets.
Wooden butterfly tag.
Peg Butterfly.
Gold Butterflies.
Dragonfly brads.
Washi Tape.

2nd Prize.
(for using both a Theme and a Colour + your butterfly/ies )
Please state in your post which part of the wheel you are using to play with.

Crafts - Too Embossing folder
'Small Alphabet'
+
Dovecraft Butterfly die.
Top Prize.
For using the Gate fold card element + Butterfly
(It is not mandatory to use any or all of the other elements
but I'd love to see if you do. )

Craftworks
Butterfly stamp set.
+
Dovecraft
Sentiment stamp.
There will also be a Special 7 Elements Prize Draw
for those using all of the 7 Elements.
(This is in no way compulsory just an added fun extra.
Please be sure to read all the rules on the tab above and the new prize requirements.
Enter your creations in Mr Linky below.
Please also state if you are only playing for fun.
Happy crafting and see you soon.
Challenge is back to 2 weeks.