R
is for
ROCKER CARDS.
is for
ROCKER CARDS.
Version I
To make the basic rocker card shape use a circle die or a plate to draw round. Here I have used a circle die with a 5.25" diameter. Score and then fold the circle in half. Tip to make sure the card keeps it shape and does not slide open cut a small length of cardstock . I have used a piece 2.75" long and 0.5" wide scored each end at 0.25".


Version II
This shape is a Side Stepper Rocker.
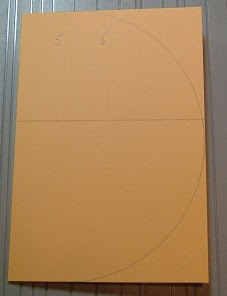
If you do not have any large circle dies then use a plate to draw round. I found a side plate that was 7.5" diameter to use for this example. Whatever size plate/circle you use add 0.5" and cut a Square of designer paper to this size. My plate is 7.5" so adding 0.5" gives me an 8" square. Here I have used plain white card to make it easier to see.


Now using a score board place the cardstock as shown with the line you have just drawn towards the top of the score board.
To create the folds for the stepper, mark 1" either side of the centre fold .
The score mark is already there at the 4"mark so now score at 3" and at 5"but only down to the line you have marked. Tip. This is why the circle has not yet been cut as it is a lot easier to score lines on a straight edge than a curve.
Fold the cardstock back in half and cut on the line down to the next score line. (This is a lot easier than trying to cut a slit in the circle.)


Version III
This shape is a Double Sided Stepper Rocker.
If you do not have any large circle dies then use a plate to draw round. I found a side plate that was 7.5" diameter to use for this example. Whatever size plate/circle you use add 0.5" and cut a Square of designer paper to this size. My plate is 7.5" so adding 0.5" gives me an 8" square. Here I have used plain white card to make it easier to see. Fold cardstock in half at 4" on one side only.
Now rotate cardstock so that your score line is horizontal. Draw two lines with a pencil (do not score) top to bottom at 2.5" and 5.5".
 Now rotate cardstock so that your centre score line is vertical and using the pencil lines as a marker score from top down to the first pencil line only at 3" and then at 5". Do the same from the second pencil line down to the bottom of your cardstock.
n.b. Do not score the centre sections.
 Now fold your cardstock as shown below and cut along both pencil lines up to the score line( through the double thickness of the fold).
 You are now ready to create the rocker shape so taking your saucer place it centrally (using only half of the plate) and mark round with a pencil to create the curve.
 Cut round the curve with scissors.
 Mountain/Valley/Mountain fold at the score lines and fold down flat. Cut away the excess on either side of the curve.
 Card shape is now complete and you can decorate as required. n.b If card keeps sliding open then create a small tab inside the card as shown in the instructions above for Version I.
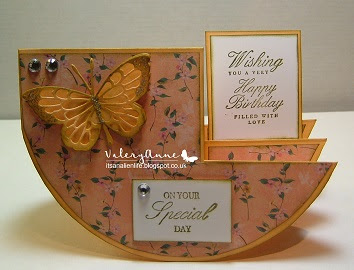
 Just remember that you need to keep the rocker balanced so whatever you put on one side you need to place an embellishment on the other side to counter it as shown in the decorated card below.

Now rotate cardstock so that your score line is horizontal. Draw two lines with a pencil (do not score) top to bottom at 2.5" and 5.5".

n.b. Do not score the centre sections.


Version IV
This shape is a Side Stepper Rocker but I have created more of an old fashioned pram shape for it. Again I am using a plate to create my shape and here I have chosen a 6" diameter. This time though the side measurement needs to be the same as the plate size so I have cut cardstock 8" which becomes the depth of the card( when folded in half) and 6" the same as the plate measurement. Score and fold at the halfway mark which here is 4"
 Rotate card so that the fold is horizontal and draw a pencil line from top to bottom of cardstock at 3.5"
 N.B. I have changed to coloured cardstock as I am making the card in real time.
Rotate card back so that the scored line is vertical. Now score from top of cardstock down to the pencil line only at 2", 3", 5" and 6".
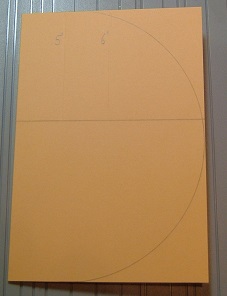
 Fold cardstock back in half on the fold line and with the folded side to the left and the score marks at the top place your plate so that the rim is right on the edge as shown in the picture below. Use a pencil to follow the curve of the plate but stop either side when the curve reaches the side. n.b. Do not continue to the odd shapes on the left.
 You can now see that you have a circle with a flat section in the centre at the curve. This is correct as it makes the pram shape.
 With the folded edge of the cardstock towards you, using scissors and on the pencil line cut along it to the second score line as shown below.
 And then cut away the curve.
 Now Mountain/Valley/Mountain/Valley/Mountain fold the score lines and fold card flat. You will now see excess cardstock beyond the curves which needs to be cut away.
 Your card should now look like below.
 This is the cardstock lying out flat and you can see the elongated shape which looks a bit like a C shape with teeth!!!
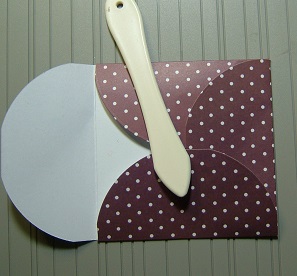
 Here is an aerial view looking down on the card shape.
 and the card from the front showing the pram shape.
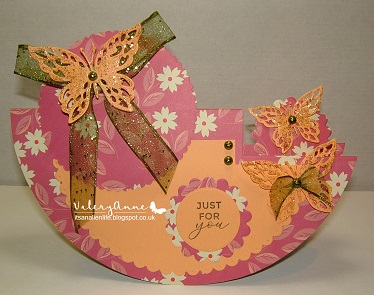
 Just remember to balance the embellishments on your card when you decorate it so that it rocks centrally. On the card below I needed to add the two gems to the top left of the card over the butterfly before it rocked evenly.


Rotate card back so that the scored line is vertical. Now score from top of cardstock down to the pencil line only at 2", 3", 5" and 6".