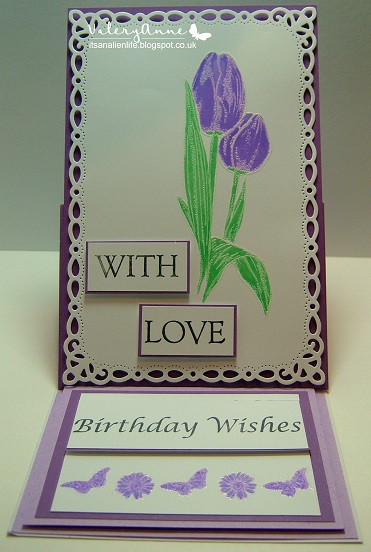
Tuesday, April 23, 2019

Impossible Card.


I
is for 
IMPOSSIBLE CARDS.

Version I

Cut your card stock to 5" x 7" and on the 5" side mark at 2.5" and draw a thin pencil line top to bottom.

Lay cardstock so that the 7" length is at the top of Scor -Pal and score at 3.5" to the pencil line only.

Turn cardstock round so that the opposite 7" length is to the top of Scor-pal. Now score at 1" and 6" but again only to the pencil line. 
One last score line is needed so turn cardstock so that the 5"is to the top of Scor-pal. Now score between 1" and 6" score lines at 2.5" (on the pencil line).
You can now remove the pencil line either side on the 1" panels as these are not needed. 
I have drawn a pencil line on each of the score lines to make it easier for you to see what you should now have on the cardstock. 
Now either cut with scissors or a trimmer on the 1" lines and the 3.5" line.
Do not cut along  the 2.5" line.


Cuts should look like below on your cardstock.


Nearly finished. On flat surface with the 1" flaps towards you fold the middle section to the top of the page and score with a bone folder. 


To make next stage easier to see I have glued design paper to the section we will be twisting.


Hold top of flap with left hand and at the same time with right hand twist the design section over so that the blank side becomes visible.


Now fold the middle section down towards you.
Score fold in the gap now showing with a bone folder.


Your Impossible card is now ready to decorate as required. 

As you decorate cut a thin strip of cardstock approx 1" wide and attach to front of finished card to make card more stable. You can also add your sentiment here. 


Version II

Follow the instructions as above and when you have the cardshape made cut a piece of toning cardstock to 7.25" x5.25" and adhere to base of impossible card. 

Trim a strip 1" wide to attach to the front of the card for the sentiment.
Decorate as required.

Version III

Make your card base in the same way as Version I  above using cardstock cut to 6" x6". Score at 3" for the middle of the card and make the tabs either side 1.5" wide.  In the middle section place your die cut  half an inch from the middle score line and then put through your die cutting machine placing  the Top cutting plate leaving a quarter of an inch of the die clear. 
 This is to leave a tab for the butterfly to stand up with. Carefully cut along either side of this tab.
 You should now have a  middle piece which is free to remove and discard leaving the butterfly element.
 Fold the butterfly down and use a bone folder to crease each side of the tab to the middle only
 Hold the butterfly up and the rest of the card will hang down.As you push the card flat down the other side of the butterfly  will start to  flip over.
 Keep pushing down until the card is flat.
 You will now have the butterfly element standing up ready to decorate.  You can do this with any die cut as long as you remember to make the tab at the bottom before cutting out.
On the decorated card below the butterfly has been additionally cut out using a spotty design paper and adhered to the base card with a further layer added in a contrasting  spotty paper. N.B.  The die cut used  is in two pieces. 1 plain outline and the second die shape has a design cut into the wings.


Wednesday, April 17, 2019

#121 Spin The Butterfly wheel with E for Easel.

We are  now onto the 5th  letter of the alphabet which is E. Winners results for #120 are published in the post below. Make sure you check back as it could be you.  Can I please ask that  Winners do acknowledge their prize in the comments on the Winners post as well as emailing their details to me. This way I will know to expect an email.  Please state if you are only playing for fun so that it gives someone else the chance to win.  Challenge is for 2 weeks. 
So we have a brand new wheel to spin and this yr we are going to go straight through the letters of the Alphabet starting with A. 

                                                     Come on in.


Lets Spin the Butterfly Wheel.
Each challenge will be a letter of the Alphabet with  a choice of 3 Colours and 2 Themes all beginning with the chosen letter.
New for this Yr. The 7th element of the wheel is a card shape.
(The discerning amongst you will notice that there is now an added page along the top under the Butterfly Banner called Card shapes.)
There will be a card shape for the letter being used for each challenge and I will be showing a tutorial on this page with hints and tips for making the cards. 
The card shape is not mandatory but if you do use it you will qualify for the top prize without having to combine all of the other 6 elements onto your card. You must of course  use your butterfly.   The shapes will all be easy ones, just a different way to either fold or cut your basic cardbase. 

If you don't want to use the card shape then 
You can either choose a Theme or a Colour from the wheel + Butterfly  to be entered  for the 1st Prize.

If you use a Butterfly + a Theme + a Colour from the wheel then 
you  will  be entered into the 2nd Prize. 
Please state in your post which part of the wheel you are using to play with.

So lets get started.
The wheel is
E
and 
Easel Card. 


Your 6 elements are  Emerald Green/Egyptian Blue/Eminence* /Embossing Folder/Edges + your Butterfly.
*According to the Spectrum wheel Eminence is a Dark Purple.
Here is my inspiration for you. 


My first card uses Easel card/Emerald Green/Eminence/Edges/Butterfly

Single Easel Card.


My second card uses Easel card/Eminence/Edges /Butterfly

Double Easel Card.


My third card uses Easel card/Egyptian Blue/Embossing Folder /Butterfly

Double Twisted Easel Card.


You can see more details of the cards here on my blog.
Check out the Card shapes Tab above to see how to make the Easel Cards.

1st Prize.

(for using either One Theme or One Colour with your butterfly/ies)
Please state in your post which part of the wheel you are using to play with.

2  Butterfly background sheets.
  3D Pearl paint.
 Peg Butterfly.
Silver  Butterflies.
String of butterflies.
Butterfly ribbon holder.


2nd Prize.
 (for using both a Theme and a Colour + your butterfly/ies )
Please state in your post which part of the wheel you are using to play with.

Craft Consortium stamp set
'Wildflower Meadow'
Dovecraft Layering Butterflies Die.


  Top Prize.
For using the Easel card element + Butterfly
(It is not mandatory to use any or all of  the other elements
but I'd love to see if you do. )

Creative Expressions stamp
' Phoebe's Fleur De Lys'
Thanks sentiment stamp.
(Will fit inside the framework)
Marianne Design Butterfly Die.


There will also be a Special 7 Elements  Prize Draw
for those using all of the 7 Elements.
(This is in no way compulsory just an added fun extra. 

Please be sure to read all the rules on the tab above and the new prize requirements.
Enter your creations in Mr Linky below.
Please also state if you are only playing for fun.

Happy crafting and see you soon. 

Winners #120

Wow, 35  entries this time and seven of the entries used the dutch fold. I am so pleased that you tried the shape. 
There were lots of lovely cards to choose from so again i have split my selection into Standard card entries and Dutch fold. 

Here is my Top 3 selection of standard entries. 

In numerical order  they are

(12)    Nisha

Love the Cas style and monochrome. 


(16)    Esther
You really need to read how Esther coloured her flowers! 


(18)   Vinita Jain
The diamond pattern background just blew me away.

Here is my Top 3 selection of Dutch fold cards. 

In numerical order  they are

(13)    Sandy J.
I love this pretty pastel scene.

(19)    Terrie

Love the flowers using all 3 colours. 

(26)    Jane
Love the aztec look and was the only entry to use all 
seven elements so a Special Prize is on its way to you Jane.

Congratulations everyone.
please take a bow and help yourselves to
The Top 3
Badge from the side bar.

1st Prize
For using either one theme or one colour + your butterflies.
The Winner picked from the tea cup is:

(6)  Chandini.

2nd Prize
For using both a theme and a colour + your butterfly.
The Winner  picked by Random Org is :

(3)  Valerija.


Top Prize
For using the Dutch Fold  card element + butterfly.
The Winner picked from the tea cup is:

(29) Becca Yarling.

Chandini, Valerija and Becca
Please get in touch using the email address in the side bar
to collect your prizes.
Please also take the Winner's Badge from the side bar.
Can I also please add that you acknowledge your win
In the comments box below so that 
I know to expect an email from you. 


Hope to see you all back for # 121

Happy Crafting.


Tuesday, April 09, 2019

Hinged Card.

H
is for 
HINGED CARDS.

Version I
This style of card is based on using a fancy filigree shape die such as the ones made by Spellbinders. 
 I have used Spellbinders 'Marvelous Squares' for this Tutorial. 
Using your choice of die, cut one piece from plain cardstock. 
Tip.  When using intricate dies I use wax paper between the die and the design paper for easy removal.
Take a larger piece of cardstock and score a line 1" from the edge and fold under. 
 Now place this (fold side down) on your cutting plate, then the wax paper (if using) and finally your die cut. Position the die cut so that it is only just overhanging the folded edge and tape in place.
Tip  Washi tape makes a good temporary  fastener and does not leave a mark or tear the card stock when removing. Place second cutting plate on top and put through your die cutting machine.
 You should now have two pieces of card stock as below. One which has a hinge on it.
 Apply double sided tape or wet glue to the hinge area only.
 Adhere to the wrong side of the front so that when the card is closed the smooth side of the cardstock is to the outside. At this point if you do not mind seeing the join then you can just go ahead and finish your card.
 I prefer to have the inside as neat as the front so I die cut one further piece of cardstock using a lighter/thinner design paper.
 Here you can see I have added the design paper to cover the join and also used the same paper to decorate the inside of the card where the sentiment or plain card (for signing the card) will go.

Version II

How to make a hexagon shape card using a hexagon die cut and cardstock when 
the cardstock is too small to simply fold in half and place the die cut to the fold to create your card. Follow these simple instructions instead  to create your own card base. 

Die cut one hexagon from cardstock. From a larger piece of card score 1" in from one end and fold under.
  Now place this (fold side down) on your cutting plate, then  your die cut. Position the die cut so that it is only just overhanging the folded edge and tape in place. Place second cutting plate on top and put through your die cutting machine.
 Adhere double sided tape to the hinge and attach to the other hexagon shape to create your card base as shown below.

 You can decorate the inside of the card to cover the hinge that is showing.