Thursday, January 26, 2023

Standing Pop Up

S
 is for 
STANDING POP UP CARD.

Version I
This is a picture of a finished card using the design instructions to make.


1. Cut cardstock 10.5" x 4.25".  Cut another piece to be 5" x 3" N.b. You will need to use 300gms thickness of card.


2. Score the large piece along the 10.5" length at 0.5",1.75",3.75" and 5".


Score  the smaller piece at 0.5" and 1.75" along the 5" Length.

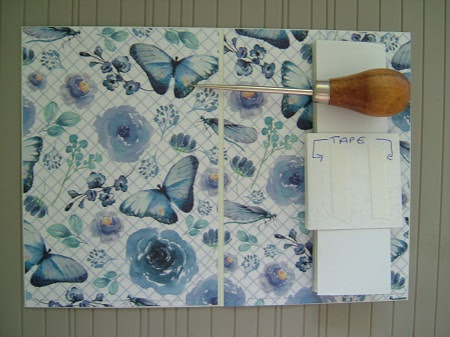
3. Fold on the score lines as shown below but do not use a bone folder on the folds.
Adhere d.s. tape to the two 0.5" folds. 


4. You will need to add your design paper to the back of the cardstock before continuing further.  Cut design paper to be 4" x 4" and adhere to the back panel as shown below. . 


5. Fold back as shown and remove backing from the d.s tape on the narrow edge. 


6. Carefully fold  the narrow edge under and stick down to the back panel.

7. Add design paper to the lower section as shown. 

8. You can now fold the bottom part into a box shape as shown below.

9. Attach design paper to the smaller cardstock.
10. Decide at this point whether you want the pop up in the centre or the left or right of the back panel. Here I am adhering to  the centre. Place the pop up ( folded as shown) to the side of card level with the top  and remove the backing from d.s.tape.

11. Carefully flip over and stick down in your required position keeping the folded panel level with the top as shown. 
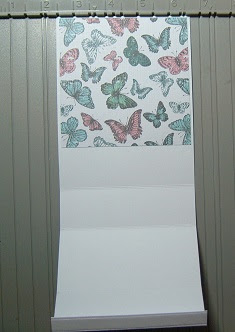
12. Lift up panel and you will see that it is only adhered to the back by the narrow strip and not the top edge. (This is correct).

13. Attach d.s. tape as shown below. 
14. Remove backing form d.s.tape and fold down onto the box part of card as shown below. 
15. Card is now done and you can finish by decorating as required. 

Version II
This is a picture of a finished card. It is made using the same instructions as above. Just the sizing is different and I have placed the top panel to the right. 

1. Cut cardstock 11.75" x 5".  Cut another piece to be 6.5" x 3.25" N.b. You will need to use 300gms thickness of card.

1. Score on 11.75" length at  7", 8" 10.25" and 11.25". Score on 6.5" length at 5" and 6"

Continue as before to finish adjusting the designer paper to fit cardstock. 


Wednesday, January 25, 2023

#177 Spin The Butterfly Wheel with D for Double Slider Card.

Welcome to another year of challenges in the butterfly garden. 
The Butterflies are back with a fresh round of card shapes for you. 
Whilst I do have lots of different shapes to try I don't necessarily have one to use for each letter of the Alphabet so I am choosing them randomly and some letters will be used more than once and in any order!

 The Second  letter out of the Tea cup for January  is 
the letter
D
Come on in.
Lets Spin the Butterfly Wheel.

Each challenge will be a letter of the Alphabet with a choice of 4 Colours , 1 Theme and a specified Card shape all beginning with the chosen letter.

As before I will be showing a tutorial for each of the card shapes.
 A link to the tutorial page is shown above under the banner heading. Just click on the Card Shapes tab and you will be taken to a drop down list of all the past and present card tutorials.

 You must of course use a butterfly on your entry but there are two categories for you to choose from.

1.    Make any style card/project using at least 2 of the colours on the wheel +butterfly. 

2.    Make a card using the Card Shape +any 2 of the colours + the theme +butterfly.  

There will be a prize for each category. 

 Please state in your post which part of the wheel you are using to play with.

There will be a special prize draw for using all  the elements from the wheel.

So lets get started.

The wheel is

D

for 

Double Slider Card.


These are the four colours to choose from. 

The theme is  Die cut.

Please state the elements of Your Choice.

Here is my inspiration card for you.
Using from the wheel
Double Slider card/Die Cut/Dairy Cream/Denim/ Dandelion/Butterfly.

There are many ways of making this card but I like this version as it stands up for display.
Here is the card with the slider element on show. Just pull the ribbon tab to display. 


Prizes

Prizes for this year are going to be a different format.
 We are all now struggling with rising living costs and whilst it is always nice to receive a new stamp we still need to purchase for ourselves the fundamentals of our crafting hobby
so I have decided that the prizes will be a selection of just those items that we use on a daily basis and always running out of. 
i.e. D.S tape, cardstock, washi tape,ribbon, glue pens, stickers,gDems,enamel dots, 3D pads, tape runners  etc.
(The Butterfly Prize Box is now fully stocked with a selection of the above items)

I will include one fun item that can be used in your craft room just for you. 


Please be sure to read all the rules on the tab above.

Enter your creations in Mr Linky below.
Please also state if you are only playing for fun.

Happy crafting and see you soon.


This challenge will be  running for 3 weeks.
Challenge will therefore end 

Tuesday 14th Feb 8pm (GMT) 


Winners #176

I am over whelmed with all your entries. 38 wonderful cards. Thankyou so much for taking the time to come along and play with me. I am pleased that 15 of them were Four Panel Cards.  As usual you gave me a hard time choosing my favourites. They were all so good. Thank you  for participating. 

  My non shape selection of entries in numerical order are as follows: 

 #10  Vinita Jain


 #23 Kathy Asper


 #32 Made By Mandy


Four Panel  style cards in numerical order are as follows:

#8 Margreet


#18  Donna T


#26 Sue


 Congratulations everyone.
Please take a bow and help yourselves to
The Top 3
Badge from the side bar.

The Prize winners are as follows.


For entering a card using any 2 of the colours 
+ your Butterfly.

(29) Dr Sonia S V 


Here is your prize you have won. 
Penny  Black Stickeroos
Gem Stones x2
6mm d.s Tape
Glitter Washi Tape
A6 Card Blanks with Envelopes. 


for entering a Four Panel  Card using any 2 of the colours
+ Flowers
+ Butterfly

(28)  Nicole G.


Here is your prize you have won. 

5"x7" Card Blanks with Envelopes
A6  blank sheets (50)  160 gsm
A6 patterned card set (24)
Enamel Dots
3mm Mounting foam tape
Floral Washi Tape


Special Prize 

For using all 7 elements on your card. 

The name pulled from the Butterfly Mug
is

(22)  Becca Yahrling


 Sonia, Nicole G and Becca

Please get in touch using the email address in the side bar to collect your prize.
Can All 3 of you please let me know your favourite colour when emailing me as it will be incorporated in some way into your prize!

Please also take the Winner's Badge from the side bar.
Can I also please ask that you acknowledge your win
In the comments box below so that 
I know to expect an email from you.

Challenge #177 will be starting  8am (GMT) 25th Jan.

See you back soon. 


Tuesday, January 24, 2023

Hidden Panels Card.

H
 is for 
HIDDEN PANELS  CARD.


This is a picture of a finished card using the design instructions to make.

Inside of card showing the hidden panels. 


This card is very easy  to make. 

1. Cut cardstock 21cm x 14.5cm. Score in half at 10.5cm.


2. At this point you will need to add your desired design paper to the inside of the folded card. 


3. Cut 4 panels of  Design paper 3.5cm x 13cm. 


4. Cut 4 panels of plain card stock 4cm x 13.5cm


5. Adhere the patterned panels to the blank panels. 


6.  Cut panel in desired  cardstock for the front of your card 10cm x 14.5cm.
Also cut a strip of cardstock 5cm x 25cm. 


7. Fold the strip in half and then in half again to create a valley, mountain, valley as shown below. 


8. Turn strip over to reverse side and adhere d.s. tape to each of the outside folds as shown below. 


9. Turn back  to right side and adhere strips of d.s tape to the centres of each panel as shown below.  N.b. Do not adhere too near to the edges or it will show.

9. Now attach the four panels (as shown below) to the strip spacing evenly.
 

10. Attach any sentiments/embellishments to the strips at this point as it is easier to do whilst flat. Concertina the panels flat, Open your card and place the panels (spacing evenly top and bottom and to the outside edge) down on the inside of the card front as shown below. 

11. Remove the d.s. tape and then carefully close the back of the card down without moving the folded panels. 


12. Open card back up and concertina the (now attached panels) flat to the back of card as shown below and repeat the procedure above by carefully closing the front of the card down onto the folded panels. 


13. Open card and panels will now be attached as shown here.  N.b. You will not be able to lay the card completely flat  (whilst open) but it will concertina down and close flat for placing in an envelope for posting. 


14. You can now decorate the front of the card as required.