Wednesday, August 26, 2020

#146 Spin The Butterfly Wheel with C for Curtain Fold Card.

We have now started the new round of letters of the alphabet . Winners results for #145  are in the post below. Make sure you check back as it could be you. Can I please ask that  Winners do acknowledge their prize in the comments on the Winners post as well as emailing their details to me. This way I will know to expect an email.  Please state if you are only playing for fun so that it gives someone else the chance to win.

Can I please also ask that if you are a winner that you do use your gift certificate.
All the companies that I have selected have a wide range of digital items for you to purchase and download so if you buy them you will incur no extra postal charges. 
It is upsetting for me to see gift certificates left sitting in my accounts with these companies. I do not receive these for free, I purchase them myself and I do not receive any freebies from them either for my own use.  I am therefore from now on putting a time limit on these certificates. Please use within 2 months of being emailed to you or loose them. I am sorry to have to make this stipulation but I just cannot keep on buying these certificates for them to remain unused.


Come on in.
Lets Spin the Butterfly Wheel.
Each challenge will be a letter of the Alphabet with  a choice of 3 Colours , 1 Theme and a specified  Card shape  all beginning with the chosen letter.

(The discerning amongst you will notice that there is an added page along the top under the Butterfly Banner called Card shapes.)
 I will be showing a link to a tutorial on this page with hints and tips for making the cards so just look under the letter being used for each challenge. 

The card shape is not mandatory but if you do use it you will qualify for the top prize. You must of course use your butterfly and the other elements.  The shapes will all be easy ones, just a different way to either fold or cut your basic cardbase. 

If you don't want to use the card shape then 
You can either choose a Theme or a Colour from the wheel + Butterfly  to be entered  for the 1st Prize.

If you use a Butterfly + a Theme + a Colour from the wheel then 
you  will  be entered into the 2nd Prize. 
Please state in your post which part of the wheel you are using to play with.

So lets get started.

The wheel is
C
and 
Curtain Fold Card.


  Your  elements are:
Curtain Fold Card/ Colouring Pens or Pencils/Carnation Pink/ Carrot Orange/Citron
+your Butterfly.
         

Please state the elements of Your Choice.
                  

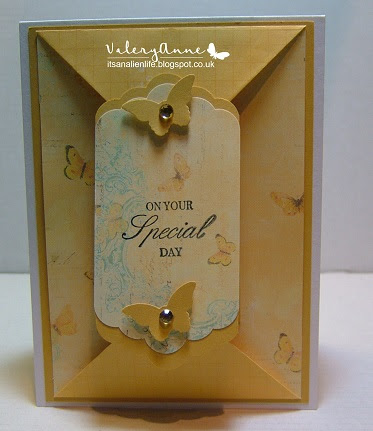
Here is my inspiration for you .

First card using:

Version I

 Curtain Fold Card/Carnation Pink/Carrot Orange/ /Butterfly.


Second card using:

Version II

 Curtain Fold Card/colouring Pens/Carnation Pink/ Carrot Orange/Citron
/Butterfly.


Version III

 Curtain Fold Card//Carnation Pink/Butterfly.


You can see more details of the cards here on my blog.
Also tutorials are on the Card shape Page at the top under the banner header. 

Please Note.
Due to the current ongoing  situation with Covid 19
I have decided to still opt for sending out Gift Certificates instead of the usual prizes.

Bugaboo Digi Stamps are an on line Craft Company which also do Colouring Pages as well as some Digital Paper packs.
They have a huge range of Digi stamps to choose from by theme.
 You will be spoilt for choice .

1st Prize.
(for using either One Theme or One Colour with your butterfly/ies)
Please state in your post which part of the wheel you are using to play with.

Bugaboo 
Gift Certificate.


2nd Prize.

 (for using both a Theme and a Colour + your butterfly/ies )
Please state in your post which part of the wheel you are using to play with.

Bugaboo 
Gift Certificate.

  Top Prize.
For using the Bow Front Card + all the other elements
+ your Butterfly

Bugaboo 
Gift Certificate.

From to time I will also have a special draw prize when an entry particularly catches my eye.  

Please be sure to read all the rules on the tab above.

Enter your creations in Mr Linky below.
Please also state if you are only playing for fun.


Happy crafting and see you soon.


Please Note.
This challenge is running for 3 weeks.
Challenge will therefore end on Tuesday 15th of Sep. 


Winners #145

Thankyou to everyone who came and played along in the new set of challenge letters. Not so many of you tried the  Bow Fronted fold but thankyou to those that did. I am so impressed and very grateful that you have taken the time to come along and play with me. All of your cards were lovely.

I have selected the following non shape cards for my top 3 and in numerical order they are as follows:


#7 Glenda

Glenda never disappoints me  with her  embroidery cards.


#8  Lia

I love the blues in this card.


#16  Kathy A.

I just adore this brilliant book mark.


My top 3
 Bow Fronted Cards in numerical order are as follows:


# 10 Hazel.

Hazel is only playing for fun but i love her card. 


# 11 Susan R.

A justifiable winner.


# 15 Annie.

A burgundy delight. 


Congratulations everyone.
please take a bow and help yourselves to
The Top 3
Badge from the side bar.

The Prize winners are as follows.


1st Prize.
(for using either One Theme or One Colour with your butterfly/ies)

The Winner picked from the tea cup is:

(14) Becca Yahrling


2nd Prize.

 (for using both a Theme and a Colour + your butterfly/ies)

(2)  Elisa


  Top Prize.
For using the Accordion Fold Card + all the other elements
+ your Butterfly

The Winner picked from the tea cup is:

(11) Susan Renshaw

Becca, Elisa, Susan R. 
Please get in touch using the new email address in the side bar
to collect your prizes.


Please also take the Winner's Badge from the side bar.
Can I also please ask that you acknowledge your win
In the comments box below so that 
I know to expect an email from you. 


Hope to see you all back for #146

Stay Safe and Well.


Saturday, August 01, 2020

Double Point Fold

D
is for 

DOUBLE POINT FOLD CARD.


Version I
1. Uses cardstock cut to 4.25"" x 5.5" for the card base.  You will also need a piece of patterned card stock  cut to 4" x 5.25"


2. To make the points you will need two pieces of contrasting design paper  cut to 
    3" x 4". Score at 1" down the long side.


3. Turn paper over and make a mark at the half way point i.e 2". Fold each corner into the this centre keeping level with the 1" score line. 

4. This will create the two v shape points.  Stick or glue the flaps down in place.

5. Using glue or d.s. tape attach the points to both the top and bottom of the design paper.
6. Attach the 1" flap to the reverse side of the design paper.
7 The front should like this.


8. Attach to the base cardstock.

9. You are now ready to complete the front of your card.
10. From plain cardstock cut a piece that measures 2.25" x 4". Mark 1" down top and bottom  and pencil a line across. Make a mark at the centre point top and bottom. draw lines from this central point out to the edge of the cardstock to create the points. Either use scissors or a trimmer to cut the corners off.
11. Cut a duplicate from the design paper and on the reverse mark in 1/8th" all the way round  and then either trim with scissors or your trimmer on this line.

12. Attach these two pieces together as below. 
13. Attach the panel to the top point only on the front of the card so that card is free to open up. A sentiment/verse/plain panel can be inserted here.

14. Finish decorating the front as required.


Version II

This shows a different way to create the double points and also has a closure to hold the front flap down in place.  

1. Uses cardstock cut to 4.5" x 11.5" Score either end on the long side as shown below.


2. On the two scored ends mark the centre point which will be 2.25". From this mark draw lines out to the score line as shown.  Either cut with scissors or use a trimmer to cut away the corners. 
3. Card base will now look like below. Fold and score well on the two creases.


4. Cut two pieces of design paper that are 4.5" x 2.75". Make sure that if your are using a directional paper (as I have here with wording on) that you cut the points going in the right direction for the top and bottom of the card. n.b  See 6. below.
5. Find the middle of the paper again and mark. Draw two lines out to the corners from this point and either cut with scissors or use a trimmer to remove the corners.
Cut on the inside of the line so that the finished points will be slightly smaller than the points on the base card.
6. You can see here that my wording is cut so that it is the right way up on both of the points.  Cut a piece of design paper that is 4.5" x 5.75" for the inside of the card. 
7. Attach the design paper to the base card. You may need to trim the edges down  slightly to fit as it will depend on how thick your scrore lines are on the card stock. 
8. Add a sentiment is required.

9. For the front closure I have used circle dies for the centre and a smaller circle raised  up with 3d pads for the bottom of the circle to rest behind.  n.b. Make sure that you only attach the circle to the top double point. 


Version III

1. These instructions are for making as a tent fold cad. 
Start by folding a piece of cardstock 4.25" x 11.5" in half to create the tent fold.


2. Cut two pieces of cardstock  4" x 5.5" . Cut another two pieces of design paper  3.75" x 5.25". n.b.  In the photo the design paper is turned over so that I could write  the dimensions on for you to read.
3. Use one piece of the plain cardstock and one of the design paper to layer up and attach inside the tent fold. 


4. Cut two pieces of contrasting design paper as shown below and score on the long edge at 1".
5. Fold the edges into the middle as shown below.

6. Crease well and stick down to create the points. 


7. Using glue or d.s. tape to  attach the points top and bottom of the second design paper so that the 1" flaps are on the reverse side


8. Now attach to the last sheet of plain card stock. and layer onto the front of the tent card.


9. Finish decorating the front of your card as required.  In my example below I have used a punch that creates a tag shape and made two layers up.Remember to only attach to the the top point or the flap will not open up. 

N.b. Using only thin designer paper will ensure that the panels will lie flat. 
The finished card.