W
is for
WATERFALL CARD.
1. Create a base card that is 5.5" x 7" and decorate with your chosen design paper or use coloured cardstock if prefered.
2. Cut a strip of cardstock 9" x 2". Score at 2",2.
75",3.5" and 4.25" and fold each score line.
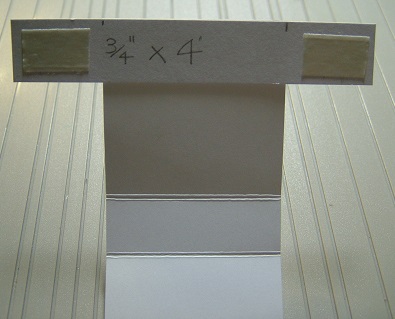
3. Cut a small strip of cardstock 0.75" x 4" and four pieces that are 2" sq.
4. Decorate the front of the strip as required and then adhere to the edge of the 9" strip at the 2" scored edge. n.b. You are seeing the back view. Attach d.s. tape either side of the over hanging strip.
5. Decorate the other end of the strip as required. n.b. This forms the back part of the waterfall mechanism and will therefore be on show.
6. Punch a hole 0.25" from edge in centre for the ribbon tag.
7. Your 9" strip should now look like this with all the folded score lines towards the back and the long piece facing towards you.
8. You are now ready to attach to your base card. Make sure that you centre evenly top and bottom and from each side. Remove tabs from d.s tape and adhere to the base card. Make sure that the panel will slide up and down freely.
9. Adhere ribbon to the punched hole and attach with a staple.
10. Check that each fold will pull through the slider.
11. It should stop when you get to the last score line fold which will leave 2"
12. Push strip back up through the slider to the top (as at No 8). You are now ready to decorate the four 2" sqs as required. Here I have used a sentiment and 3 butterfly digi images.
13. Starting with the bottom sq. attach to the 2"sq at the bottom as shown below . Also Apply d.s tape to the remaining 3 score lines.
14. Attach the next image only to the d.s.tape..
15. Attach the next image again only to the ds tape.
16. Attach the last image to the last strip of d.s. tape. Here I have used the sentiment for my top one.
17. Now see the magic happen. Start pulling the ribbon tag down and watch the pictures cascade down through your Waterfall.
One by
One.
18. Finish decorating your card as desired. Here I have added further strips either side of the waterfall and embellished with silver circles.


2 comments:
Great tutorial Mrs A loved the finished card xx
Wonderful tutorial Mrs A!
Post a Comment