Wednesday, February 15, 2023

Winners #177

I loved all of your entries.  Thankyou so much for taking the time to come along and play with me. I am pleased that nearly half of the entries were a Double Slider Card shape  As usual you gave me a hard time choosing my favourites. They were all so good. Thank you  for participating. 

  My non shape selection of entries in numerical order are as follows: 

 #8 Claudia 


 #14  Suzanne


 #19  Tina


Double slider  cards in numerical order are as follows:

#11 Sonja


#17  Klarka


#18 Suze


 Congratulations everyone.
Please take a bow and help yourselves to
The Top 3
Badge from the side bar.

The Prize winners are as follows.


For entering a card using any 2 of the colours 
+ your Butterfly.

(1) Elisha

Here is your prize you have won. 


Word & Butterfly Stickers
Stencil
3mm d.s Tape
Mini  Mounting Pads
A6 Card Blanks with Envelopes. 


for entering a Doubl Slider Card using any 2 of the colours
+ Die cut
+ Butterfly

(15)  Liz


Here is your prize you have won. 


6"x6" Card Blanks with Envelopes
A6  blank sheets (50)  160 gsm
Marianne enamel dots
12mm d.s. tape
Dimensional  foam pads
Double ended glue pen


Special Prize 

For using all 7 elements on your card. 

The name pulled from the Butterfly Mug
is

(5)  Wilma


 Elisha, Liz and Wilma

Please get in touch using the email address in the side bar to collect your prize.
Can All 3 of you please let me know your favourite colour when emailing me as it will be incorporated in some way into your prize!

Please also take the Winner's Badge from the side bar.
Can I also please ask that you acknowledge your win
In the comments box below so that 
I know to expect an email from you.

There is a hold up with sending prizes  out at the moment.
The Post office is still not accepting International parcels due
to  ongoing issues with the cyber-attack they had back in January.
Rest assured though your parcels are all here waiting to go and I will update as soon as the Post Office resumes taking them. 

Challenge #178 will be starting  8am (GMT) 15th Feb.

See you back soon. 


Tuesday, February 14, 2023

Pillar Card.

P
 is for 
PILLAR CARD.

Version I
This is a picture of a finished card using the design instructions to make.

1. Cut cardstock 10.5" x 5.5". 

2. Then score on long edge at 0.5",1.5",2.5",3.5", 7", 8", 9", 10"
3. Fold each score line inwards as shown below.
4. Cardstock should be shaped like this when stood  up on one long edge.
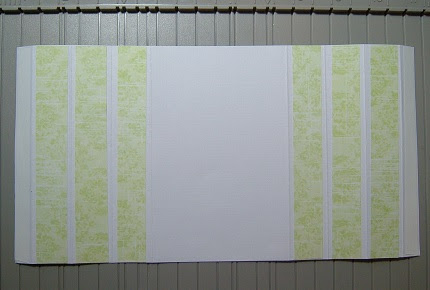
5. It is easier to decorate the panels flat before you make into the pillars either end.
Lay card back down flat with the creases upper most. The center section I have left blank as this will be the back of the finished card and can have your message written on it for the recipient. Adhere d.s tape to the two outside folds (i.e  0.5" panels)
6. Now turn over and adhere your patterned paper to the middle section only. This will be the inside panel on the finished card. 
7. Remove the d.s.tape and fold the outside edges in, to form the pillar. In the picture below I have already created the left hand pillar.
It is easiest to form the pillars with the cardstock lying flat so tuck the d.s.tape edge under and fold the next two panels down onto the cardstock base. Once adhered down you can shape them back up into the pillar. 
8. The card is now ready to be decorated as you require. Attach your embellishments only to the pillars on each side so that the card can then be folded down flat for posting.  N.b. Do not attach to the back panel as well otherwise the card will not open back up.


Version II
This is a picture of a finished card using the design instructions to make. This card is the same as before but is made wider.
1. Cut cardstock 11.5" x 5.5".  Then score at 0.5",1.5",2.5",3.5", 8", 9", 10", 11"
2. Decorate the panels as before. Here I have covered the back panel as it is wider. I will add a smaller white panel insert for the message to be written on. 
3. Decorate inside panel as before and follow the same instructions above to complete the card. 


Version III
This is a picture of a finished card using the design instructions to make. This is a single pillar card. You can make the pillar to be either on the left or right hand side. Here I have chosen to place on the left.
You can see from the picture below that the panel is placed in the centre of the pillar.  The pillar is 1" square so the panel has 0.5" in front of it and 0.5" behind.

1. Cut cardstock 6.5" x 6". This is the base panel. Cut a second piece to be 5" x 6" This makes the pillar.

2. Score the 5" x 6" piece along the 5" length at 0.5",1",2",3",4",4.5" 


3.  Then fold on each score line as below.  Decorate the panels marked with X and also decorate the back panel.

4.  Card should now look like below. Adhere d.s. tape to the 0.5" edges on the same side as you have attached the design paper. 


5.  Place the folded cardstock face down onto the back panel (i,e design papers together) remove the d,s, tape backing and adhere down so that the two edges on the left are together.
6.  Open out. Cardstock should look like below. 
7.  Turn over and bring the other edge of scored cardstock round to form the rest of the pillar and adhere the same as before. 

8.  Your card should now look like below with the back panel attached in the center of the pillar. 

9.  You can now finish your card as required.  


Version IV
This is a picture of a finished card using the design instructions to make. Very similar to the card above except the back panel is smaller and the pillar is adhered to the front and the  finished card will look like version I but with only one pillar.

1.  Cut cardstock 8" x 6" and score along the 8" length at 0.5",1.5",2.5" 3.5
2. Fold on the score lines the same as in version 1. Form the pillar in the same manner as instruction No 7. You can make the pillar to be on the left or on the right. Here I have made it on the left.  Decorate and finish card as required.