H
is for
HANGING WINDOW BOX CARD.
Version 1.
This is a picture of a finished card using the design instructions to make.
1. These instructions are for making a card that when closed down flat will measure
4"x 5.75".
Cut a piece of card stock 8.25" x 5.75".
On 8.25" side score all the way down to the bottom at 3.5", 4", 7.5" and 8".
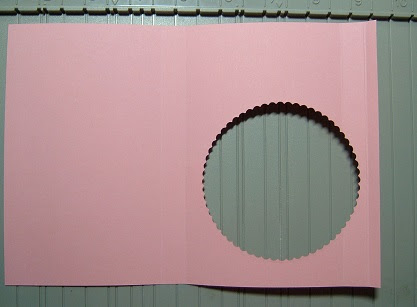
2. Place your chosen die cut (I m using a scallop circle shape) for the window aperture on the cardstock so that the outer edge is halfway between the 7.5" and 8" score lines as shown below.
3. Turn card stock over. Add d.s tape to the short edge and adhere down to form the box shape.
You should now have a slim stand up box (i.e like a match box cover) with a cut out on the front.
4. Cut another circle(or the shape you are using) from contracting cardstock and use a larger die cut to make a frame to cover the front of the box card.
4. Adhere the frame over the front of the card making sure you only attach the part of the die covering the front area , leaving the overhang free as shown below.
You can now finish decorating the front of the box card as desired.
NB. In hind sight I found using the scallop die for the inside edge quite fiddly to match up when applying the outer frame so I tried it the opposite way round as pictures shown below. It does give a different look to the front.
Try using the plain circle inside of the scallop. It is easier to match the circle on the front of the card.
Version 2.
This is a picture of a finished card using the design instructions to make.
This makes a larger/deeper style card but the construction is exactly the same as above.
1. These instructions are for making a card that when closed down flat will measure
5.5"x 6".
Cut a piece of card stock 11.5" x 6".
On 11.5"" side score all the way down to the bottom at 4.75", 5.5", 10.25"and 11".
Version 3.
This is a picture of a finished card using the design instructions to make. On this version I have used acetate to back the front of the card and not made a larger frame around the heart die cut. Instead I used a smaller heart die and simply attached to the heart frame and the acetate leaving the overhang free as before. A completely different look again.
1. These instructions are for making a card that when closed down flat will measure
4"x 5.75".
Cut a piece of card stock 8.25" x 5.75".
On 8.25" side score all the way down to the bottom at 3.5", 4", 7.5" and 8".
2. Lay your chosen die cut shape on the cardstock as shown below using a smaller die cut inside the aperture size. i.e Cuts in one go to save time.
This will give you the following pieces. For my card I am only using the smaller heart
3. Lay a piece of acetate on the reverse side of the cardstock to cover cutout. N.b. Make sure you only butt it up to the score line as shown below. I have also added the inside design paper before making into the box shape.
4. Add ds tape to the end score line and adhere the box shut.
5. Card box is now ready to finish as required. Here is another finished design simply using the discarded die cut heart and die cutting a smaller one from inside the shape. Adhered offset to the heart shape on the front but still hanging over the edge. I added the sentiment to the acetate so that it appeared to be floating.