
Q
is for
QUARTO FOLD CARDS.
is for
QUARTO FOLD CARDS.
Version I
Start with a sheet of design paper that is 8" square. Score on all four sides at 2"


Version II
Start with a sheet of cardstock that is 9" x 8".


Cardbase will now look picture below.

On the two big flaps top and bottom use a saucer or a plate to draw an arc as shown below.
On the side flaps slightly taper by cutting up to the corners.


Carefully fold the butterfly wings up and push through the slot to close the card as shown here.


Version III
Start with a sheet of cardstock that is 8" sq.(Tip. Do not use a heavier weight than 150 gsm as the folds will become too hard too crease). In the example here I am only using printer paper so that it is easier for you to see the folds.


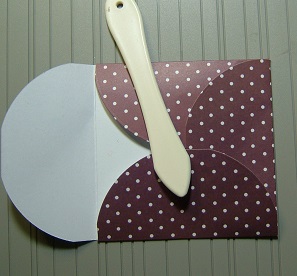
Your fold is now complete and here is an example made up. N.b. Use glue/ds tape or a glue dot to hold the fold down in place. Here I have made a simple tag to put in the pocket that the card shape produces.

Version IV


Start with a sheet of cardstock that is 8" sq.(Tip. Do not use a heavier weight than 150 gsm as the folds will become too hard too crease). In the example here I am only using printer paper so that it is easier for you to see the folds.
Fold your card stock in half and have facing you as shown below.

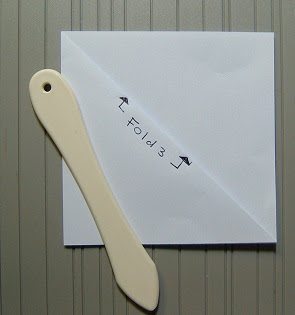
Make your second fold by bringing the the two short sides together and crease as below.

Now fold the top right hand corner (one sheet of cardstock only) down to the bottom left corner and crease as shown to make the third fold. N.b. Use glue/ds tape or a glue dot to hold the fold down in place.

Last fold is to crease a small triangle over to meet fold 3 using only one layer of the cardstock and attach same as with the other triangle. This makes a pocket on the front .

N.b the back folded sheets of cardstock can be glued together for neatness.
Your fold is now complete and here is an example made up. I have added a simple tag to put in the pocket that the card shape produces.


3 comments:
Two lovely ways to make quarto fold cards, thanks for sharing!
Wow! @ different style of intricate folding that I can't the a handle on but I love what you have done.
I've seen the first fold but not the second version. Hope to find time to do both! Thanks!
Post a Comment