U
is for
U FOLD CARDS.
is for
U FOLD CARDS.
Version I
1. Cut cardstock to 9" x 5" for your base.
Along the 9" side score at 1.5", 3", 6" and 7.5".
2. Fold as follows. Mountain/valley/valley/mountain to look like below.
3. This is where the card derives it's name ,as looking down from the top you can see a U shape.
4. This is the front of the card.
6. This strip will be attached across the front of the card but do not glue in place until all the back panels have been decorated.
7. Here I am showing a cardbase with the panels and strip decorated.
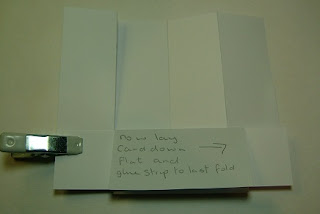
You can now attach as below. Glue the strip to the first panel only
and then lay card down flat as shown below and glue strip to last fold.
8. You are now ready to complete card with any further embellishments as required.
Version II
This version uses Acetate across the entire front of the card shape. On my card I have used a design card for the base which is only 8.25" wide so I will give you the measurements for making a slightly smaller card.
1. Cut cardstock to 8.25" x 5" for your base.
Along the 8.25"" side score at 1. 3/8", 2.6/8", 5. 4/8" and 6.7/8".
Fold Mountain/valley/valley/mountain. Add your sentiment at this point before adhering the acetate. Make holes in each corner to attach the acetate with brads.
2. Cut a piece of acetate 5.4/8" x 5". Make holes in each corner to match the ones on the cardstock above. Attach with brads.
3. You can now decorate the front as required. Here I have used a floral stamp that I have fussy cut out and attached to the acetate with 3D pads.


2 comments:
This looks pretty easy to do...I like the paper that you used....thanks for the instructions.
Gorgeous card, thank you for sharing, hugs, Lori m
Post a Comment