
The Butterflies are Back!!
The Winners for #160 have been published in post below this one.
The butterflies now have a brand new garden to play in with lots of Butterfly loving flowers for them to enjoy.
Project took a bit longer than was expected with Gravel deliveries delayed and then planting the new Herbaceous borders has taken even longer due to me altering/making up the design as I went along.
Come on in.
Lets Spin the Butterfly Wheel.
Each challenge will be a letter of the Alphabet with a choice of 3 Colours , 1 Theme and a specified Card shape all beginning with the chosen letter.
(The discerning amongst you will notice that there is an added page along the top under the Butterfly Banner called Card shapes.)
I will be showing a link to a tutorial on this page with hints and tips for making the cards so just look under the letter being used for each challenge.
The card shape is not mandatory but if you do use it you will qualify for the top prize. You must of course use your butterfly and the other elements. The shapes will all be easy ones, just a different way to either fold or cut your basic cardbase.
If you don't want to use the card shape then
You can either choose a Theme or a Colour from the wheel + Butterfly to be entered for the 1st Prize.
If you use a Butterfly + a Theme + a Colour from the wheel then
you will be entered into the 2nd Prize.
Please state in your post which part of the wheel you are using to play with.
So lets get started.
The wheel is
S
and
Slide and Lock Card.
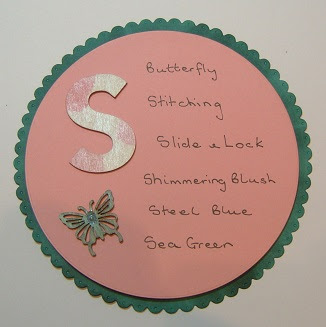
Your 6 elements are:
Slide and Lock Card/Stitching/Shimmering Blush/Steel Blue/Sea Green
+your Butterfly.
N.b. Shimmering Blush = Pale Pink.
Stitching can be Real or Faux.
Please state the elements of Your Choice.
Here is my inspiration for you.
Version I
Using all six elements on the above wheel.

Version II
Using all six elements on the above wheel.

You can see more details of the cards here on my blog.
Also the tutorial for making this style is on the Card shape Page at the top under the banner header.
1st Prize.
(for using either One Theme or One Colour with your butterfly/ies)
Please state in your post which part of the wheel you are using to play with.

Joanna Sheen Mini Curly Flourish
Pink Decorative Washi Tape
Nellie Snellen Click Flower die
Creative Expressions Raindrops Mini Stencil
2 Wooden butterfly shapes.
2nd Prize.
(for using both a Theme and a Colour + your butterfly/ies )
Please state in your post which part of the wheel you are using to play with.

Mini Green stamp pad
3 Blending nibs (for colouring)
Clarity Art Stencil
Diesire Graceful Butterflies die set
Neat and Tangled Dreams Sentiment
Top Prize .
For using the Quad Easel Card + all the other elements
+ your Butterfly

Blue mini stamp pad
Brick wall stencil
Cuttlebug Butterfly Embossing folder
Joy Crafts Butterfly Die cut
Woodware set of Butterfly stamps and sentiment
From time to time I will also have a special draw prize when an entry particularly catches my eye.
Please be sure to read all the rules on the tab above.
Enter your creations in Mr Linky below.
Please also state if you are only playing for fun.
Happy crafting and see you soon.
This challenge will be running for 3 weeks.
Challenge will therefore end
Tuesday 28th Sep. 8pm (GMT)
N.B.
It has been brought to my attention that 1 prize recipient has been asked
to pay inport duty on her parcel.
I put a lot of time,effort and thought into making up the prizes and it is certainly not my intention that you should be asked to pay to receive your prize. I had a problem with using the Click and Drop postal service in that it took my payment but did not download all of the required customs declaration forms so I had to redo and pay twice and then claim a refund
(which I have since received).
l do hope these two problems were just a glitch in the system and do not repeat themselves as I would hate to have to dispense with giving you prizes for your cards and continued support of the Butterfly Challenge.


